Show and Hide the Dock On Mac Computers
In general. most users do not have any problem with the Dock on their MacBook always being visible at the bottom of the screen. However, there are users who find the need to gain additional screen space by hiding the Dock from its default bottom position. Hence, Apple has provided such users with the option to both Hide and Show the Dock on their Macs. Once the option to Automatically Show/Hide the Dock is enabled on Mac, it will automatically Hide the Dock when it is not being used and show the Dock, whenever the mouse cursor is positioned over the bottom part of the screen. Note: If you have changed the position of Dock on your Mac to the left or right side of the screen, you will have to place the mouse cursor over the left or right side of the screen to make the Dock Show up on your Mac.
1. Automatically Show and Hide the Dock On Mac
Follow the steps below to enable the option to Automatically Show and Hide the Dock on your Mac.
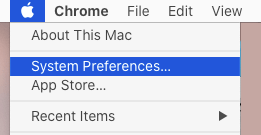
Click on Apple Logo in the top-menu bar and select System Preferences option in the drop-down menu.
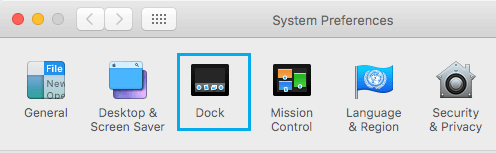
On System Preferences screen, click on the Dock & Menu bar icon.
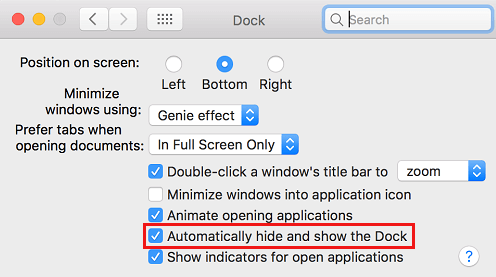
On the Dock Preferences screen, check the option for Automatically Hide and Show Dock.
From now on, you will find the Dock on your Mac being hidden while it is not being used. The Dock will Automatically Show up, whenever you place the mouse cursor near the bottom of the screen (where the Dock used to be). At any time, you can disable the option to Show/Hide Dock automatically on your Mac by unchecking the option for Automatically Hide and Show the Dock.
2. Show and Hide Dock On Mac using Dock Divider Line
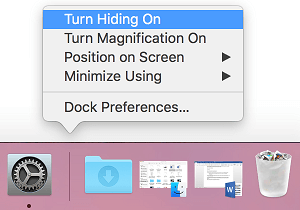
Instead of going to System Preferences, you can enable the option to Automatically Show and Hide the Dock by right-clicking on the Dock Divider line. Right-click on the Dock divider line and select Turn Hiding On option in the menu that appears.
You will find the Dock disappearing from the screen of your Mac. It will appear automatically, whenever you place the Mouse cursor anywhere near the bottom part of the screen.
3. Hide and Show Dock Using Keyboard Shortcut
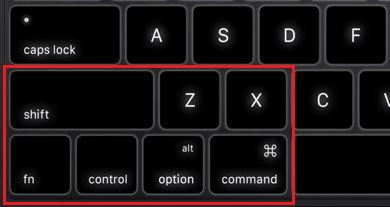
Another way to enable the option to Show/Hide the Dock automatically on a Mac is by using a simple keyboard shortcut. Press the Command + Option + D keys at the same time on the keyboard of your Mac. You will immediately find the Dock disappearing from the screen of your Mac. To Make the Dock appear again, simply place the Mouse Cursor anywhere near the bottom part of the screen of your Mac. Note: Press Windows key + Alt + D keys, if you are using a Windows Keyboard on your Mac.
4. Stop Dock from Automatically Hiding and Showing
If you do not want the Dock to Hide and automatically show up, you can disable this option and go back to the Mac’s default setting.
Bring up the hidden Dock on your Mac by pressing Command + Option (Alt) + D keys.
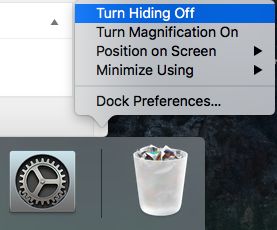
Once the Dock appears, right-click on the dock divider line and then click on the Turn Hiding Off option in the Menu that appears.
Next, click on Apple Logo in top-menu bar > System Preferences > Dock & Menu bar > on the next screen, uncheck Automatically hide and show the dock option.
How to Magnify Dock Icons on Mouse Hover How to Resize the Dock on Your Mac