Remove Microsoft Account from Windows 10 PC
While Microsoft encourages users to use Microsoft Account to login to their computers, many users still prefer using a Local User Account for their day-to-day computing needs. Having a Microsoft Account associated with the computer provides certain benefits that are not available to Local Accounts. For example, a Microsoft Account allows you to Remotely Logout of PC, remotely lock computer, sync settings across multiple devices and setup Find My Device to track the location of your computer, if it gets lost or stolen. However, if you prefer not to use Microsoft Account, you can either convert the Microsoft Account to Local Account or Remove Microsoft Account from your computer.
What Happens When You Remove Microsoft Account?
When you remove Microsoft Account, all your data associated with Microsoft Account, including all Files located on Desktop and stored in Documents, Pictures, Music, and Downloads Folder will be deleted. Hence, make sure that you transfer all your Files, Photos and other data from Microsoft Account to an External Storage Drive or another Location on your computer.
What Happens When You Switch from Microsoft to Local Account?
When you switch from Microsoft Account to Local Account, the Microsoft Account will be removed from the computer and you will be able to Login to the computer using the Local Account. Any Files, Photos and Data available in your Microsoft Account won’t be deleted and they will remain available on the computer from the Local Account. Apps and programs that you download to the computer while using Microsoft Account will still remain linked to your Microsoft Account and will require Microsoft Account login. Also, all your data, files, settings and search history will still remain linked to your Microsoft Account.
1. Remove Microsoft Account from Windows 10 PC
In order to Remove Microsoft Account, you need to be logged out from Microsoft Account and logged-in to the computer using a Local Account with Admin Privileges. If you do not have a Local Account with Admin Privileges, you need to create one using steps provided in this guide: How to Create Local Account in Windows 10.
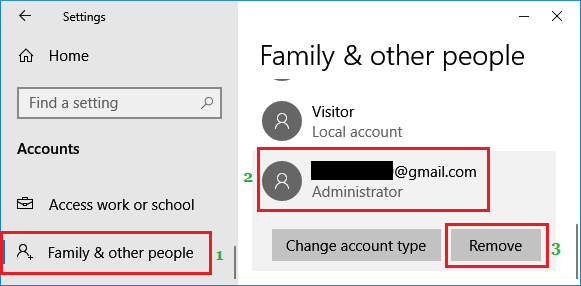
- Go to Settings > Accounts > select Family & other people option in the left-pane. In the right-pane, select your Microsoft Account and click on the Remove option.
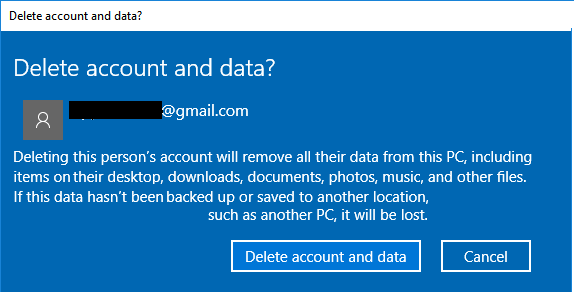
Note: The User Account that you are currently signed in does not appear under list of Accounts. 2. On the next screen, click on Delete account and data button.
As mentioned earlier, all the data present in your Microsoft Account will be deleted and the Microsoft account will be removed from your computer.
2. Convert Microsoft Account to Local User Account in Windows 10
Login to the computer using Microsoft Account and follow the steps below to convert Microsoft Account to a Local Account with Standard Privileges. Note: Before switching from Microsoft to Local Account, make sure that you create a Local Account with Admin Privileges on your computer.
- Go to Settings > Accounts > select Your Info in the left pane. In the right-pane, click on Sign in with a local account instead.
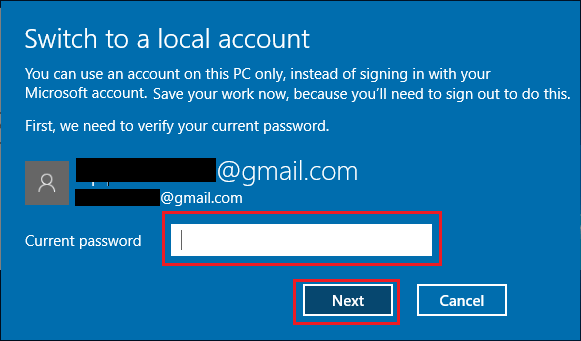
2. On the next screen, enter the Password for your Microsoft Account and click on Next.
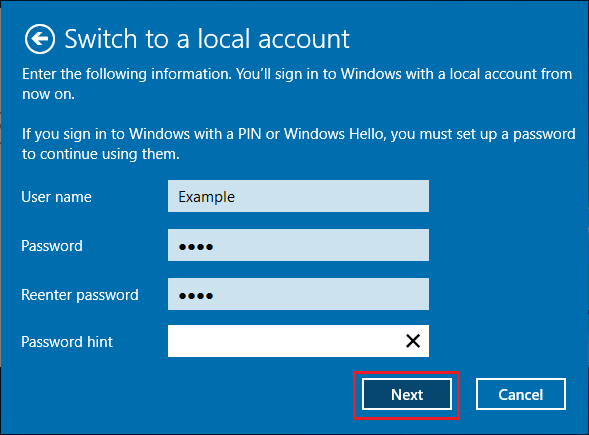
On the next screen, enter User Name and Password for your New Local User Account and click on Next.
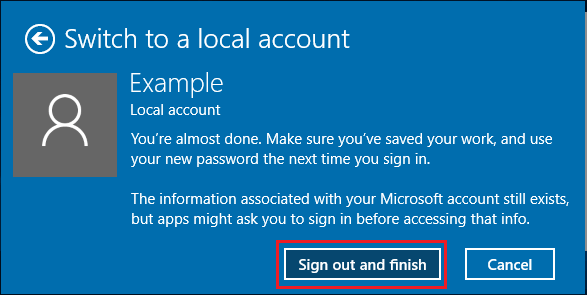
Finally, click on Sign out and finish to sign out of Microsoft Account and switch to Local User Account.
After these steps, you will be able to Login to your computer using Local Account and Microsoft Account will be removed from your computer.
How to Change User Account Type in Windows 10 How to Reset Local User Account Password in Windows 10