Create Filters in Your Gmail Account
By default, all incoming Emails in your Gmail Account are delivered to the Inbox. This arrangement leads to all types of Emails from various types of senders landing in the same Inbox. If you are receiving a large number of Emails, this default setup works can lead to daily flooding of the Inbox with all types of important and unimportant Emails from multiple senders. In such a scenario, finding a particular Email from a particular sender in the crowded Inbox can be a painful and time consuming process. Hence, Gmail provides the option to Create Filters and direct Emails matching different Filter Criteria to different Folders in your Gmail Account. For example, you can create a Folder named as “Receipts” and direct payment related Emails from Skype, Netflix and other subscription services to the “Receipts” Folder in your Gmail Account.
1. How to Create Filters in Gmail
Gmail provides the option to Create Folders and Filters at the same time and also the option to Create Folders first and apply Filters to these pre-created Labels. In this case, we are going with the option to Create a Folder and Filter at the same time.
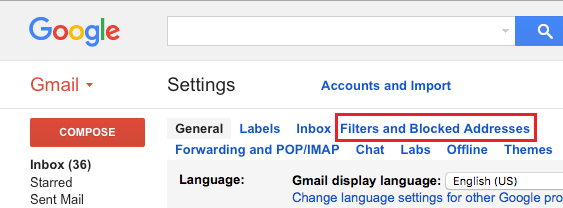
Login to your Gmail Account > Click on the Gear icon located at the top right corner and select Settings in the drop-down menu.
On the Settings screen, click on Filters and Blocked Addresses link.
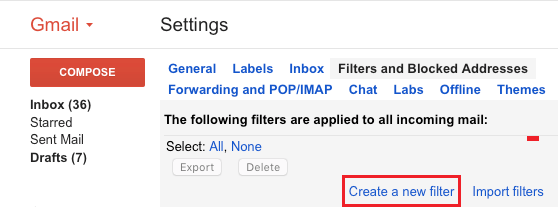
3. On the next screen, click on Create a New Filter option.
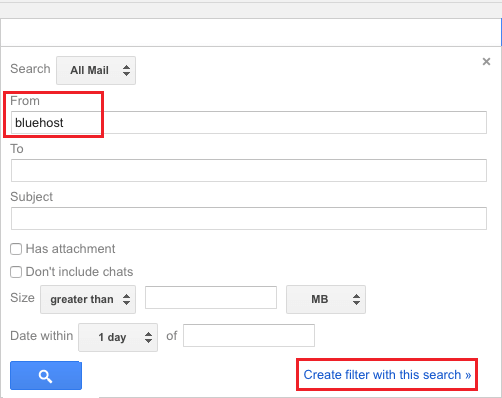
On the next screen, you can specify any Filter Criteria like Sender Name, Sender Email, Subject, Has Attachment, Has Words and other Criteria. After specifying Filter Criteria (From Sender in this case), click on Create Filter with this Search link.
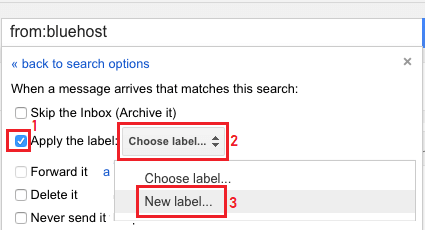
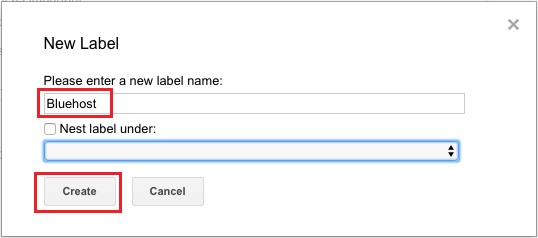
On the next screen, select Apply the Label option, click on Choose Label and select New Label option in the drop-down.
On the pop-up that appears, type a Name for your New Label and click on Create.
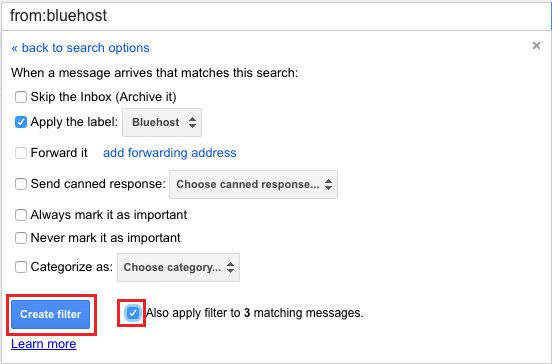
Once the new label is created, select Skip the Inbox and Apply filter to matching messages option and click on Create Filter button.
Skip the Inbox: Received Emails with matching Filter Criteria will skip the Inbox and land directly in the New Filter (Folder) that you have Created. Also Apply Filters to matching Messages: Selecting this option moves existing messages with matching Filter Criteria from Inbox to the New Label or Folder that you just created. 8. Once you click on Create Filter button, Gmail will create a New Folder with your specified Filter Criteria and place it in the sidebar menu under Categories tab.
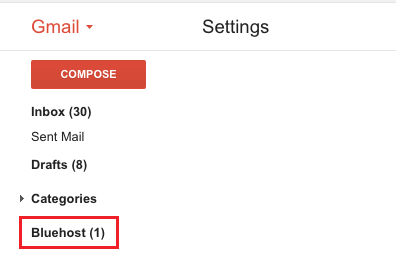
Now all the Emails matching your set Filter Criteria will be landing directly into the new Label.
How to Auto Forward Gmail to Another Email Account How to Archive and Unarchive Emails in Gmail
![]()