How to Backup Android Phone to Google
In general, most Android Phones provide the option to backup data to Google Drive, both manually and automatically on a periodic basis. In addition to this, Android Phones made by Samsung provide the option to backup data to Samsung Account and also to SD Card or USB drive. Both automated and manual backups to Google Drive on Android Phone do not include Photos and Videos. This means you will have to either backup Photos and Videos to your local computer or use Google Photos App to backup to Google Drive. Note: The process of backing up Android phone to Google may vary a bit, depending on the manufacturer of your device.
1. Automatically Backup Android Phone to Google Drive
Now that you know what is backed up to your Google account, follow the steps below to back up your Android device data to Google’s cloud servers.
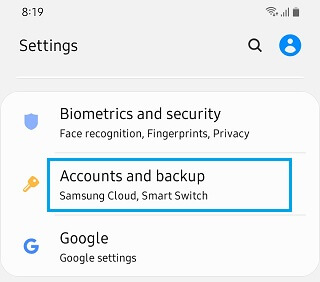
Open Settings on your Android phone > tap on Accounts & Backup (or Backup and Reset).
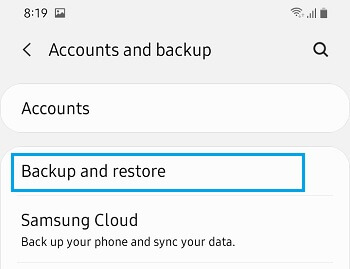
On the next screen, tap on Backup and Restore (or Backup & Reset) option.
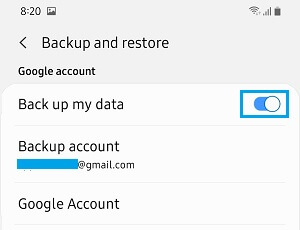
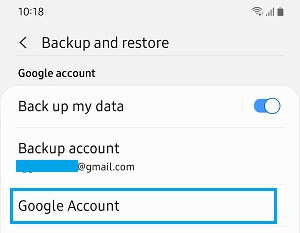
On the next screen, scroll down to “Google Account” section and move the slider next to Back up my Data to ON position.
This will setup your Android Phone to be automatically backed up to Google Account, whenever your Android Phone is connected to a WiFi Network.
2. Manually Backup Android Phone to Google Drive
In case you are looking for an update date backup, you can make a backup of your Android Phone to Google at any time on your Android Phone or Tablet.
Go to Settings > Accounts and Backup (or Backup and Reset).
On the next screen, tap on Backup and Restore (or Backup & Reset) option.
Next, tap on Google Account option located under “Google Account” section.
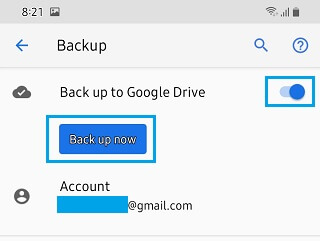
On the next screen, tap on Back up now button to initiate a manual backup of Android Phone to Google Drive.
The time to complete the backup will depend on the amount of data available on your Android Phone.
What is Included in Google Backup?
Once you provide permission to Google to access and backup your data, the following type of data can be saved to Google cloud servers. App Data: Only App Related Data as available on your device will be backed up. Apps, books and music downloaded from Google Play Store are linked to your Google Account and these can be downloaded at any time on your Android Phone. Contacts & Call History: Call History and Contacts will be backed up to Google Drive. Device Settings: Some system settings like date & time, Language, Display settings, home screen wallpapers, Wi-Fi networks and Wi-Fi network passwords will be saved to your Google account. SMS Text Messages: Only SMS Text Messages will be baked up, MMS attachments will not be included. Emails and Calendars: Email will always be available in your Gmail Account. Contacts and Calendars events will get synced with Google Calendar on your Phone.
2. Backup Photos on Android Phone to Google
Since, Photos and Videos are not included in Google Backup, you can choose from the following methods to backup Photos and Videos on your Android Phone.
2.1. Backup Photos on Android Phone to Google Photos
If space is available in your Google Account, you will be able to backup Photos and Videos on your Android Phone to Google Photos.
Open the Photos App on your Android Phone or Tablet
Sign-in to your Google Account (in case you are not already signed in)
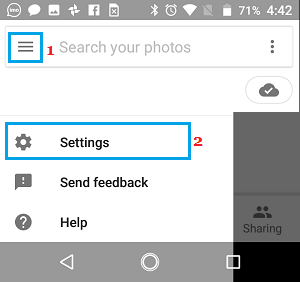
Next, tap on the 3-line menu icon located at the top left corner of your screen and tap on Settings in the drop-down menu.
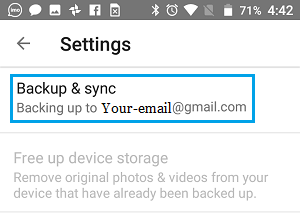
On the Settings screen, tap on Back up & sync. (See image below)
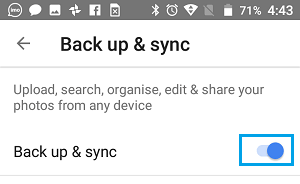
On the next screen, move the toggle next to Back up & Sync to ON position.
If space is not available in your Google Account, you will be prompted to Buy Additional Storage. If space is available, you should be able to tap on Backup All to start the process of backing up Photos to Google. using WiFi Network. In case required, you can also enable the option to Backup Photos over Cellular Network.
2.2 Backup Photos on Android Phone to Computer
If space is not available in your Google Account, you can backup Photos on your Android Phone to your computer.
- Connect Android phone to computer using its supplied cable.
- Unlock your Phone by entering your Lock Screen Passcode.
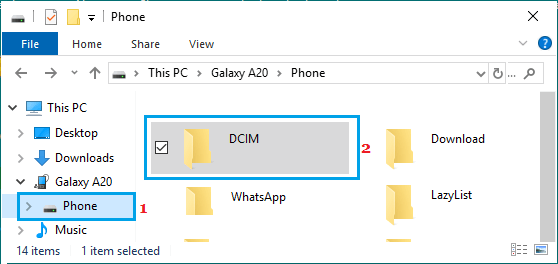
- On your computer, open File Explorer > click on your Phone in the left pane. In the right-pane, locate DCIM Folder and copy this to Desktop.
To copy the entire folder, right-click on DCIM Folder > select Copy in the contextual menu > right-click anywhere on the desktop and select Paste in the contextual menu. 4. Wait for the Photos to be copied to the Desktop
How to Backup WhatsApp to SD Card on Android Phone How to Transfer Photos From Android Phone to Mac


![]()
