Add Printer in Windows 10
Before being able to Print documents from your computer to Printer, you need to go through the process of Installing or Adding the printer to your computer. The actual process of connecting a Printer to Windows 10 computer varies a bit, depending on whether you are connecting to a Local or Network Printer. A Local Printer is directly connected to the computer using a USB Cable, while a Network printer is connected to the computer via WiFi or Ethernet Network. With this understanding, let us go ahead and take a look at the steps to Add both Local and Wireless Printers to Windows 10 computer.
1. Add Network or Wireless Printer in Windows 10
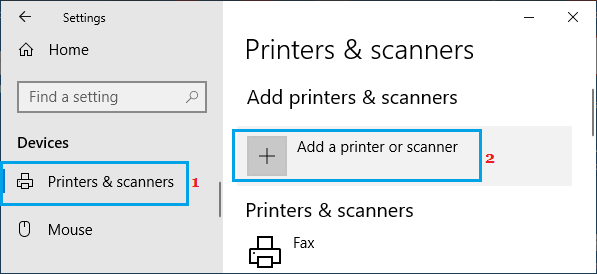
Plug the wireless printer to power supply source and start the printer by pressing its Power button. Once, the Printer starts it will start scanning for nearby WiFi Networks. Go to the LCD Panel of the Printer and open its Settings Menu. On the Printer’s Setup Menu, find the section for Wireless Settings and select your WiFi Network. When prompted, enter your WiFi Network Password and this will connect the Printer to your WiFi Network. On your computer, go to Settings > Devices > select Printers and Scanners in the left-pane. In the right-pane, click on Add a Printer or Scanner option.
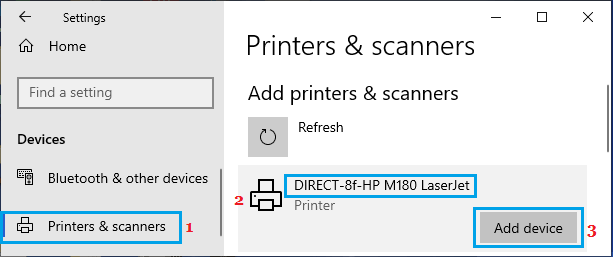
Dismiss Sign-in to Microsoft Account pop-up and wait for your computer to detect the Wireless Printer. When the Printer appears, click on the Printer and then click on Add Device button.
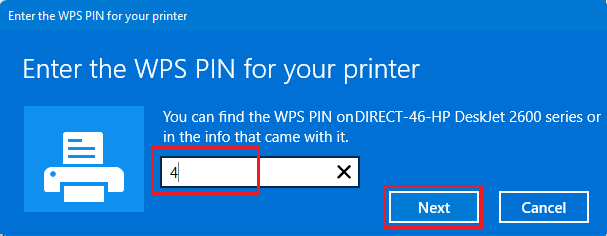
On the next screen, enter the WPS PIN for your printer and click on the Next button.
Follow the remaining onscreen instructions to complete the setup process. Note: Printers without LCD panel need to be connected to the computer in order to complete the setup process.
2. Add Local USB Printer in Windows 10
First, plug the Printer to computer using its supplied USB cable and connect the Printer to a Power Supply Source. Once that is done, press the Power button to switch ON the Printer and allow the printer to initialize and establish connection with your computer. Next, go to Settings > Devices > select Printers & Scanners in the left-pane. In the right-pane, click on Add a Printer or Scanner option.
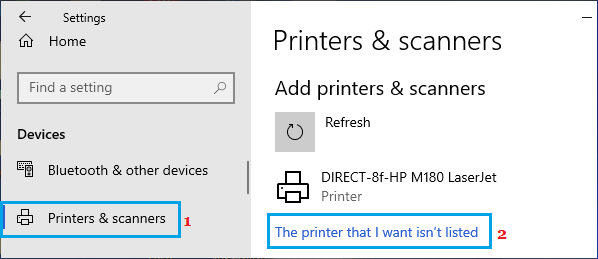
Dismiss Sign-in to Microsoft Account pop-up and wait for the computer to scan for connected Printer. Once the printer is listed, select the Printer > click on Add Device button and follow the onscreen instructions to complete the installation process. If Windows 10 is unable to detect the printer, click on The printer that I want isn’t listed link.
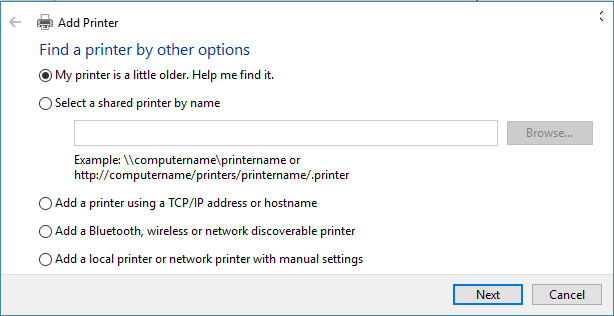
On the next screen, select “My Printer is a little older, Help me find it” option and click Next.
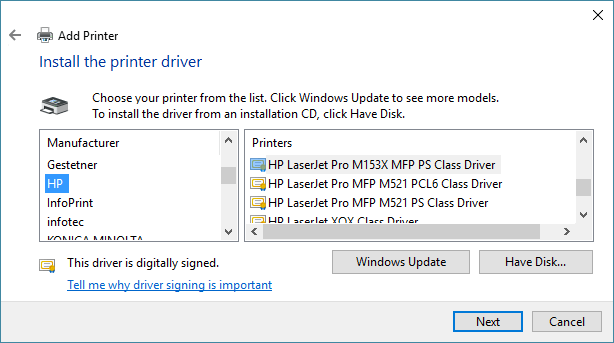
On the next screen, select your printer and click on Next to Install the printer driver.
Follow the onscreen instructions to complete the installation of Printer. On the next screens, you will be asked to provide a Name for the printer, select whether you want to share the printer with others and Print a test page (optional). Note: If the printer does not appear in the list of printers, visit the website of the manufacturer and download the driver.
Unable to Install Printer. Another Printer With This Name Already Exists How to Add Printer Using IP Address in Windows 10