Microsoft Edge High Memory Usage in Windows 11/10
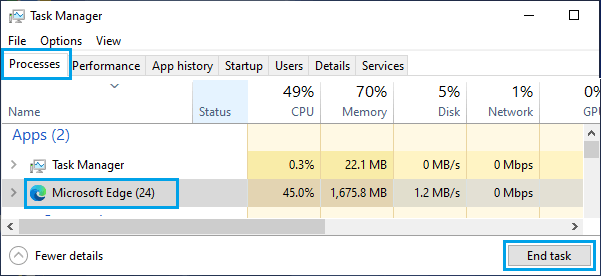
If your computer is running slow while browsing on the internet, the problem might be due to High CPU Usage by Microsoft Edge browser. To confirm, right-click on the Start button and click on Task Manager. On the Task Manager screen, switch to Processess tab and see if Microsoft Edge is consuming high amounts of CPU and RAM.
If it is consuming high amount of CPU, right-click on Microsoft Edge and click on the Close option. After closing Microsoft Edge, you can follow the steps below to reduce CPU Usage on your computer.
1. Close Tabs
A common reason for High Memory usage by Microsoft Edge browser is due to multiple Edge browsing tabs being left open on the computer. Hence, make sure that you open only the most necessary tabs and close all unnecessary tabs.
2. Clear Browser Cache
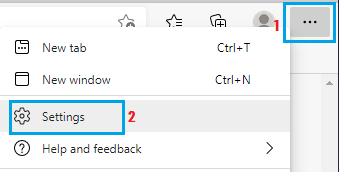
Many browser problems are related to the browser cache being clogged up with expired, broken and corrupted files. Open Microsoft Edge browser on your computer > Click on Three-dots icon and select Settings in the drop-down menu.
On the Settings screen, select Privacy, search and services tab in the left pane. In the right-pane, click on Choose What to Clear.
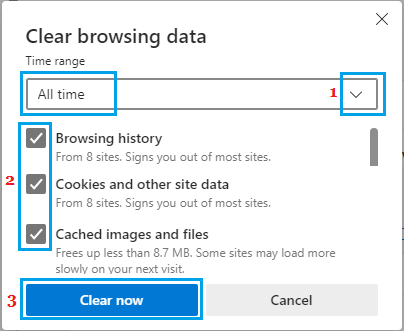
On Clear browsing data pop-up, select All Time as the Time Range, check Browsing History, Cookies, Cached Images/files, other items and click on Clear Now button.
3. Update Microsoft Edge Browser
Make sure that the latest version of Microsoft Edge browser is installed on your computer. Open Microsoft Edge browser > Click on Three-dots icon and select Settings in the drop-down menu.
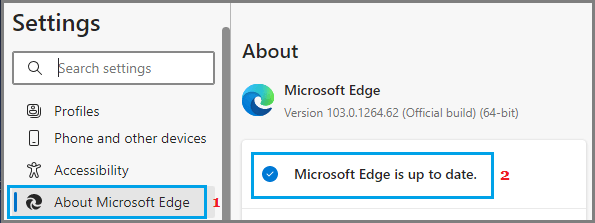
On the Settings screen, scroll down and click on About Microsoft Edge in the left-pane. In the right-pane, you will find Microsoft Edge checking for updates.
Wait for Windows to check and download the latest Microsoft Edge update on your computer. After the browser is updated, restart your computer.
4. Scan For Malware
High CPU Usage might be due to the presence of adware and malware programs on your computer. You can confirm this by running a virus scan on your computer using Windows Defender or by using the Third Party Antivirus program installed on your computer.
5. Repair Microsoft Edge
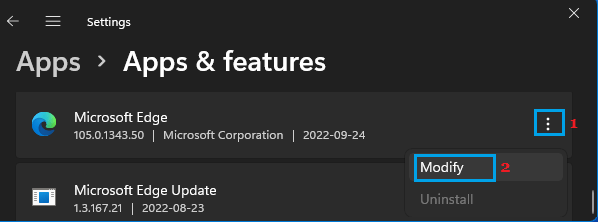
Windows 11: Go to Settings > Apps > Apps & Features (right-pane) > click on 3-dots icon, located next to Microsoft Edge and click on Modify.
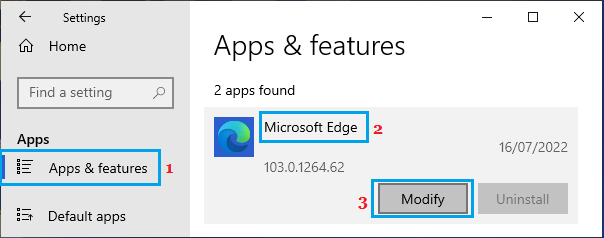
Windows 10: Go to Settings > Apps > select Apps & Features in the left-pane. In the right-pane, select Microsoft Edge and click on Modify.
On the next pop-up, click on the Repair button.
7. Reset Microsoft Edge
Open Microsoft Edge browser > Click on Three-dots icon and select Settings in the drop-down menu.
On the Settings screen, scroll down in the left-pane and select Reset Settings tab. In the right-pane, click on Reset settings to their default values option.
On the confirmation pop-up, click on the Reset button to confirm. This will disable all extensions, undo all changes and Reset the Edge browser to its original settings.
8. Disable Hardware Acceleration
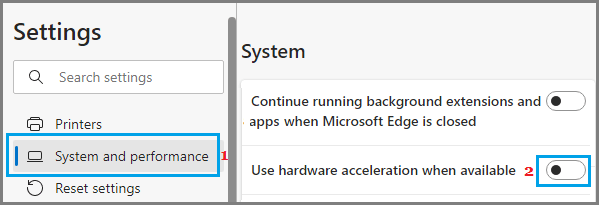
While the hardware acceleration feature can help in speeding up Microsoft Edge, it is also known to be associated with High Resouce Usage in Windows computers. Open Microsoft Edge browser > Click on Three-dots icon and select Settings in the drop-down menu.
On the Settings screen, select System and performance tab in the left pane. In the right-pane, move the toggle next to Use Hardware Acceleration When Available to OFF position.
9. Disable Startup Boost
While the Start boost feature in Microsoft Edge browser is designed to quickly launch the browses upon start, it can sometimes lead to excessive resource usage. Open Microsoft Edge browser > click on Three-dots icon and select Settings in the drop-down menu.
On the Settings screen, select System and performance tab in the left pane. In the right-pane, move the toggle next to Startup boost to OFF position.
After that, restart your browser and check if the problem remains or not.
Change Default Search Engine in Microsoft Edge to Google How to Change Microsoft Edge Download Location

